
18 April 2013
Guest Piece: An Introduction to TexturePacker
Today’s post comes to us from Andreas Loew, the Founder of TexturePacker. Offering a full-featured graphical user interface, TexturePacker includes multi-touch support, zooming, and a tree view with all used sprites. Best of all, the extremely fast layout algorithm shows all changes in realtime.
Learn more about TexturePacker, as well as how to use less texture memory and improve your game’s performance.
 I am Andreas Loew, founder of Code’n’Web. Our goal is to help people to create awesome games by offering professional high quality tools.
Currently we have two tools that work with Corona SDK: TexturePacker, which allows you to create sprite sheets that you can use with your game in less than 20 seconds, and PhysicsEditor, a physics body editor you can use to automatically trace the outlines of your game objects, creating collision shapes in seconds.
In this post, I want to help you to make your game better by using less memory and getting higher frame rates.
Improving your game
For a game, you always need graphics – backgrounds, characters, objects. You paint them yourself or your artist delivers them – usually as PhotoShop PSD files, Flash animations, or already prepared as .png files.
The first thing that comes to mind is placing all those graphics in your game’s folder and loading each one of them.
But that’s a very bad idea! Why?
Reducing memory consumption
Increasing your game’s performance
Applying what you’ve just learned
Now you know why sprite sheets really help you to improve your game. So let’s see how you can use them in your game.
For this you are going to do a simple setup with some graphics – and content scaling. TexturePacker will create the scaled assets for you – on the fly. No need to resize sprites by hand!
The assets and the project can be downloaded here: CoronaSDK-TexturePacker-Tutorial.zip.
Creating the main sprite sheet
Download TexturePacker, available for MacOS and Windows. You can use it for free with some restrictions or buy the full version. You should use the trial version for this tutorial.
After installation and your agreement to the license terms, you should see an empty TexturePacker screen.
Now you should start by adding your assets: Drag and drop the complete assets folder onto the right pane. TexturePacker scans the contents of the folder and adds all known image formats. It creates a tree view on the right with a small icon for each sprite loaded.
TexturePacker monitors this folder – any change made to a file will be updated in the sprite sheet as soon as you re-enter TexturePacker.
Sprites from subfolders are also added – they will have the folder name as part of the sprite name – e.g. “cloud/cloud_01”.
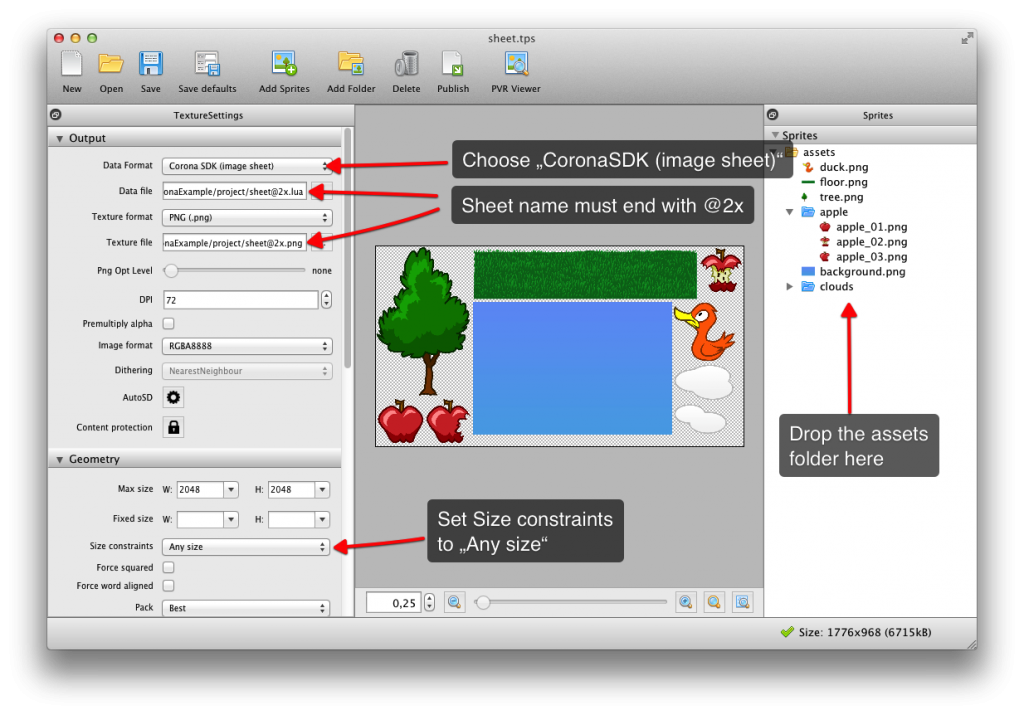
Set the Data Format to Corona SDK (image sheet) and choose PNG as the Texture format – which should be the default.
To set Data file open the file dialog with the “…” button and navigate to projects/sheet@2x.lua. For Texture file navigate to projects/sheet@2x.png.
The path will be displayed as an absolute file path, but don’t worry – TexturePacker stores all paths relative to the .tps file (which is TexturePacker’s save file format) – so if you move your project, just make sure that the basic file layout is identical.
If you press Publish now you should see a single sprite sheet – consisting of a .plist and a .lua file.
Creating resolution variants
To add the scaled-down resolution for older devices, click on the cog wheel next to AutoSD. This opens a popup window, as you can see on the next screen shot:

Select corona @2x from the Presets and press Apply. This fills the main extension with “@2x.” – that’s the part of the file name from the main sprite sheet that gets replaced to create the other resolutions.
It also adds a scaling variant in the center view – with a scale factor of 0.5 and an extension of “.”. That means that the main sheet is scaled down by a factor of 0.5 and the “@2x.” is replaced with “.” – which results in projects/sheet.lua and projects/sheet.png.
Make sure to check Force identical layout – Corona SDK needs this since it can only load 1 single .lua file containing the coordinates. It derives the coordinates for the scaled variants from this single file and thus requires all sprite sheets to have the same layout.
Finally, press Publish to create the sprite sheet and its low-res variation.
Adding the sprite sheet to your project
First you need to set up the config.lua to allow multiple sprite sheets. I am using an iPhone resolution as base units and add the matching image suffix and scale factors.
Next you need to load the sprite sheet data. This is done in main.lua using the following line:
Now load the sheet’s texture and associate the sheet information with it:
TexturePacker adds some convenience functions to the sheetInfo, allowing you to easily retrieve a sprite by its name – e.g. if you want the information for the background, simply use:
Combined with adding the background image it’s just:
The last 2 lines are for placing the image.
You can use the sprite information with the newSprite API, too:
Conclusion
You’ve now learned why sprite sheets are important for your game because they:
- Reduce memory consumption
- Speed up the rendering process
- Keep your frame rates high
You’ve also learned how you can use TexturePacker to create your game’s assets with ease:
- Drag & drop the sprite
- Set up the parameters
- Press “Publish”
Using sprite sheets has never been so easy – get TexturePacker today.

Tom Bladko
Posted at 11:50h, 18 AprilI am using texture packer for about a year and this is just THE best texture packer 🙂
MrB
Posted at 14:56h, 18 AprilI agree
its a great tool!
Also PhysicsEditor is very good
keep up the good work Andreas!
Mick
Posted at 21:59h, 18 AprilHope a combined how to use with physics editor tutorial comes along as well.
Using the 2 together is key…
Sprite sheet and physics shape tutorial please 🙂
Sprite helper has a nice animation feature, much like TP overall
Mo
Posted at 23:35h, 18 AprilFantastic tutorial. I bought both soft (texture and physics) but unfortunately did not get a chance to use it yet. I am getting ready for my next app and this is timely! Will love some info about using it for sprite animations as well:)
Thanks again!
Mo
Sid
Posted at 17:30h, 25 AprilThey are both great tools and even better that Level Director (www.retrofitproductions.com/level-director) now supports both of them, so I’m now able to create animations, levels and scenes with hardly no coding at all, perfect!
Yos
Posted at 01:36h, 30 NovemberIf someone is using TexturePacker v3.2.1, you will need to do these changes if you are using ‘autosd’, or else you will get an error like ” filename for autosd variants must contain placeholder”.
Corona SDK lua file : “Desktop/Sprite1/sheet{v}.lua”,
Texture file : “Desktop/Sprite1/sheet{v}.png”
Renato
Posted at 02:50h, 08 MarchThanks Yo. I was having that problem here.
Dumitru Vilceanu
Posted at 05:02h, 19 JuneThat’s true, when I wanted to publish a new sprite collection created using TexturePatcher I have put: “Desktop/User/sprites{v}” as a location where to save the plist and png file
Vilceanu Doru
Posted at 05:03h, 19 JuneThat’s true. You need a “{v}” in the file name when you press publish. No ideea why.
david
Posted at 23:33h, 07 OctoberThanks! Very helpful.